

Discover the latest industry news and audio post production.

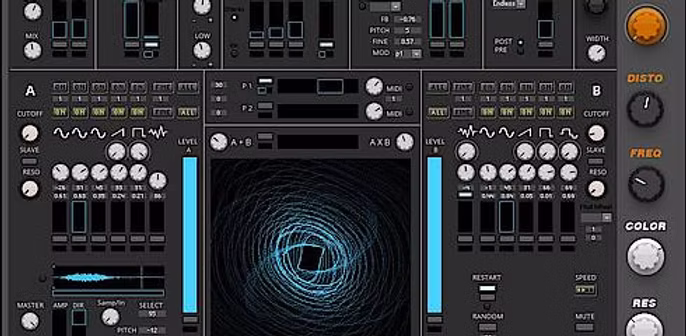
This blog explores how we use the Korg Minilogue for sound design in audio post-production. From eerie horror ambiences to custom game sound effects, this versatile synth offers endless creative possibilities. Discover our favorite features!

November 23, 2021
The Korg Minilogue is a two VCO per-voice, four-voice, polyphonic analog synthesizer from Korg, designed by Korg engineer and synthesizer designer Tatsuya Takahashi.
We recently picked up the Korg Minilogue and thought we would make a video demonstrating how we use it for sound design in our audio post production workflow. We have been using the minilogue for a little over a month now and have found it to be a very versatile tool. From creating custom sound effects for a video game to the bone chilling ambience of a horror film, there are many creative options with this synth. Our favourites are the unison voice mode, ring modulation and audio rate LFO.

This blog highlights five of the best free Reaktor ensembles for film and game sound design. From eerie drones to realistic lava and vintage radio effects, these powerful tools will elevate your projects. Download them now!
November 23, 2021
Digital Synthesis/Sampling is an often underexploited tool in the modern world of Film and Game Sound Design, with many professionals choosing to record sound effects, use analogue synthesis or utilise effects libraries instead. There are some areas where Digital Synthesis is very powerful, especially with tools available in the free Reaktor User Library - check out some of our favourites below.
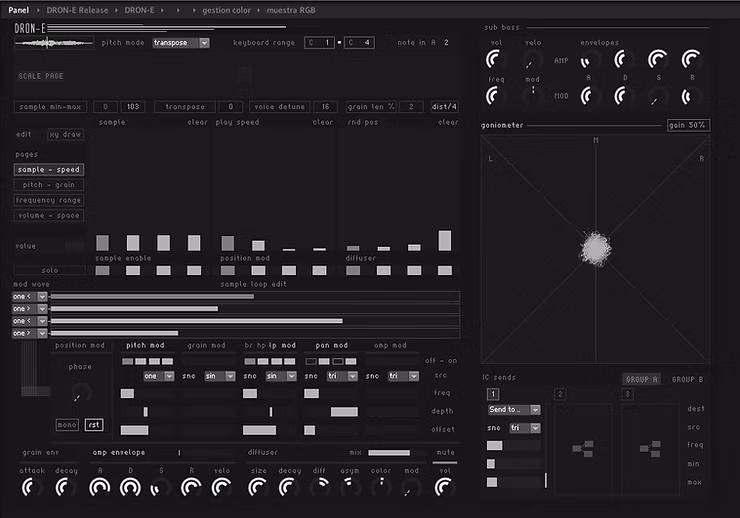
Drone-E is a free ensemble which uses a variety of unusual parameters to modulate samples. Granular synthesis, pitch shifting, reverb and a sub generator to name a few. All in all, this has got to be one of our favourite methods for creating drones in software ever.
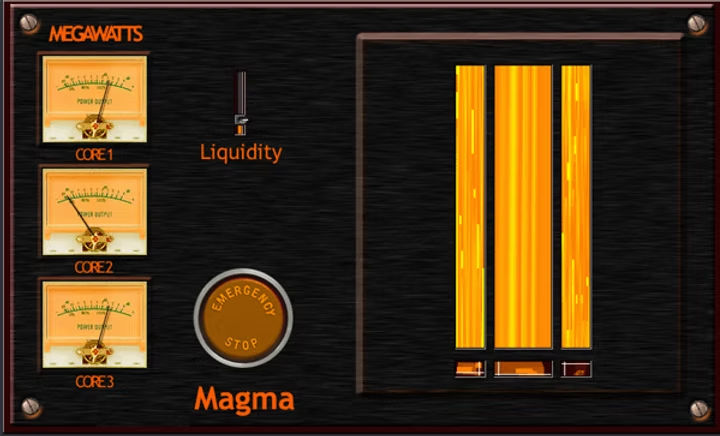
Magma is a hidden gem in the free Reaktor User Library. When tracklaying volcano scenes, it can be difficult to get the consistency of the lava just right. Magma solves this issue with its generation of liquidy textures that sound VERY convincing in a tracklayed post session or busy video game mix.
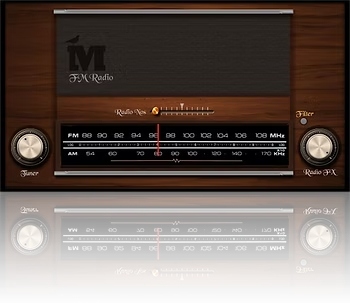
Want that authentic classic radio sound in your mix, warts and all? You’ve come to the right place. The free but very valuable FM Radio has all the typical controls you would expect to find including frequency, noise and filtering. It works as an effect within Reaktor.
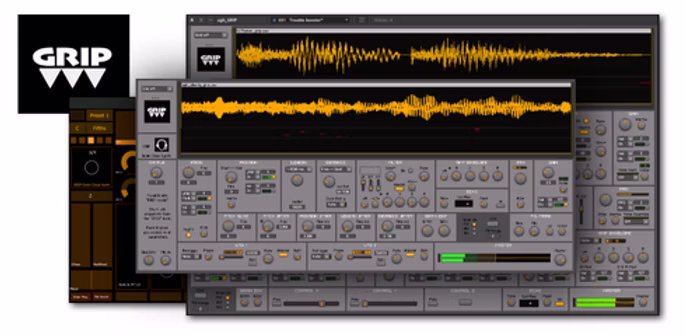
Granular synthesis can feel like a complex task in some interfaces. The free GRIP synth can launch your samples into the cloud and soften them into tender droplets of granularity.
Download Grip Grain Cloud Synth Here
An absolute classic ensemble reskinned for Reaktor 6. This generative drone synth has provided hours of endless fun at 344 HQ, as well as some serious alien planet soundscape goodness. This must needed makeover makes the seemingly complicated interface feel more logical, a must have for Reaktor users.
Download Metaphysical Scenery Here
So there you have it, 5 amazing free ensembles for Sound Design, let us know your favourites below in the comments section.

This blog outlines how to build a DIY Foley pit, covering planning, necessary materials (plywood, concrete, gravel, etc.), and construction tips for creating various sound surfaces.

November 23, 2021
For any budding sound designer, there's nothing more exciting than the prospect of having your own foley pit. However, the build process can often be daunting for those who are unfamiliar with D.I.Y projects or working with restrictive budgets. In this article, we will share with you a short guide for building your own foley pit.
To start with, look at the room you want the pit to be in and make a measurement of how much room you have to play with. Then decide how many different substances you want based on the room you have available. Common substances used for foley include - Wooden floorboards, Concrete, Gravel/Stone, Leaves, Carpet.
For example, using 4 different surfaces, each section 2x2 feet would require a square with a minimum area of 16sq feet. This does not account for extra space needed to separate the different sections of the foley pit, which would ideally be a few inches, so it's best to assume you will need slightly more space than you think.
If you have limited space available, this puts restrictions either on the surface area of each section, or the number of different substances you can include, so it's up to you to decide whether to have fewer sections and more space or more sections but less room to manoeuvre.
Once you have made a decision, you should make a rough plan using pen and paper, sketching out the layout of the foley pit and where you want everything to go.
A foley pit is essentially interlocking wooden or concrete frames that each contains a different surface. The frames can be constructed by cutting plywood into four panels and gluing them together. Wooden pallet beds are also a good option and can be reconfigured into frames without too much difficulty.
You can then position wooden panels or floorboards on the top of the frame to create a wooden surface. For earth surfaces such as dirt or rocks, you may want to line the wooden frame with sound blankets to dampen the resonance of the wood or use a less resonant material such as concrete or brick for the frame.

A trip to your local D.I.Y or garden supplies store should provide you with all of the materials and tools that you need to build the pit.
Our Basic shopping list looks like this:
We hope you find this guide useful.

This blog explores 5 unique sounds found in the UK, including Big Ben’s chimes, wood pigeon calls, football chants, police sirens, and the distinctive ambiance of the London Underground.
November 23, 2021
If you are living in the UK or visited the UK, you might have heard these sounds. Here's a list of 5 sounds that you will only hear in the UK.
Built-in 1859, Big Ben is the largest of the five bells on The Elizabeth Tower which is at the north end of the Palace of Westminister in London. Widely known as Clock Tower, it is one of the most famous destinations in the UK. The Chimes of Big Ben are one of the unique sounds you will experience in the UK.
Wood Pigeons are the most common type of pigeon to appear in gardens across the UK. The 'cooing sound' makes it distinct from other wildlife you may find here.
You will never find a Football stadium in the UK without its iconic chants. Even though the chants vary from team to team, the British chants are very well known with fans around the world. Here are some of the popular chants from the UK:
The sirens for Police and other emergency services vary in different countries. The traditional UK siren "nee-naw" has mostly been replaced with sirens similar to American-style wail, yelp or phaser. These sirens work between the frequencies of 1KHz to 3KHz, as our ears are most sensitive in this range. Here's how the police sirens sound in the UK.
The ambiance of the London Underground is unique with its announcements and train sounds. The noise from the Jubilee Line 1966 stock trains, rumbles from the tunnel, announcements featuring 'Mind the Gap', and chattering of busy commuters build a distinct soundscape. You will never experience this in any other part of the world.
Thanks for checking our post!

This blog shares 5 tips to enhance your field recording sessions: bring essential gear, plan your session, set up properly on location, organize your archive, and most importantly, have fun capturing the world’s sounds.
November 23, 2021
How often have you tried to go on a field recording session where something inhibits your session or the quality of your sound? There are many factors that can affect and improve your recordings in the field.
This article is a one stop guide to help you improve the quality of your field recording trips and the sounds you obtain from them.
The first and most obvious item to bring is the field recorder itself. As another option of recording, you can use additional microphones that can be connected to the external inputs of the recorder. These are handy if you want a specific microphone for a particular sound. Contact microphones and hydrophones are also extremely useful for abstract sound capture. You can often find unique sound sources underwater or from within an object. Never leave your additional microphones or cables at home.
.avif)
The next important item is a camera tripod, mic stand or boom pole. These are essential in having as little contact with the recorder as possible. Human contact with the microphone often results in audible muffled scrapes and bumps.
The last thing you should always bring is the accessories and spares. The main accessory you should always have when recording outside is a wind shield. Even though they are not 100% effective, they take away a lot of the rumble. If you are recording for a long duration of time or you are on a long trip you should always have extra batteries. Sometimes it is useful to have different file storage units if you are working on multiple sessions in one trip, to save confusion.
To increase the longevity of your session, don't forget to bring refreshments and wear comfortable clothing. Make sure you have a rugged rucksack that is both protective and waterproof to ensure your equipment stays safe and with you all the time.
Planning your recording session is vital to its success. There are many questions you must ask yourself before you go ahead with your session. For what I'm recording, is the weather going to get in my way? If so, you should rearrange until the weather is suitable. Rain and wind can be incredibly destructive to audio in the field. Are the clothes I'm wearing loud? Leather and coat fabric make considerably more noise that soft fabric. This can be destructive to your recording if you move in the background.

What do I want to record? If you are destined to a certain sound or location specific sound, research suitable locations nearby which may contain the sound source you are looking for. For example, if you are wanting to record traffic, it is more suitable in a city or town centre at rush hour, rather than on a quiet road in the middle of the day. Do I have permission to record in a public place? Certain areas may permit you recording, i.e. a train station. It is useful to check with whoever manages the area if it is okay for you to record there.
Once you have reached your location, the best thing to do initially is to scout where the optimum mic placement may be. If your source is inaccessible you may want to put it as close as possible. One thing that is often undermined, is the low level noise elements. This may be a nearby road or some local event that is undesirable in your final recording. It is best to find a place which shields you as much as possible from the noise but still allows you to be in a good position to pick up the sound source. Additionally if there is a lot of wind it is best to record down wind so there is as little air slamming on to the front of the mic as possible. Make sure the stand is secure and is not going to fall over during the recording.

Now you have finally turned your field recorder on, it is nearly time to hit record. You may want to record in the highest sample rate your device can handle. There are a few reasons for this. Even though it does take up more storage, this does future proof your work. Some years down the line we could be consuming media in 96kHz or even 192kHz. For later manipulation, higher sample rates are less prone to artefacts as there are more data points per second, therefore, a signal processor has to fill less gaps in these data points.
You need to gain stage your input so that you leave yourself plenty of headroom for unexpected variance in the sound but enough drive so that you have a higher signal to noise ratio. If you are recording long ambient sounds, it is better to vacate the proximity of the recorder to add as little noise as possible. Additionally if you need 5 minutes of ambience it is better to record perhaps 10 minutes just so when you edit the sound, you are left with more options to choose for your final 5 minute cut.
Generally as a rule of thumb, there are specific things to include in your file hierarchy and file naming structure that makes finding and knowing what a file is much easier.

So what should a good archive include? If you are developing a general collection of recordings and it isn't for a specific project or sample pack, a folder with the collection name is a good starting place. The date is a very handy tool for file location within a folder structure. A parent folder of the year with all the months inside is generally a good way to go. If you are really organised you may go down a more categorical route and start with Ambiences, Foley and Spot effects, then further break down these into subsequent categories, then subcategories.
If you are working on a specific project, may that be a sample pack or field recording for some visual media, you may want to be cohesive to that project and allow it be in its own collection to avoid confusion and mix ups.
When it comes to file naming, there are some metadata tags that are heavily useful for archival purposes. The following are common on professional file names:
For example this is a filename you could use:
<Library Name_Forest Footsteps_M_CU_Rustle_Snap_Crunch_344 Audio_48kHz-24Bit_15-07-19>
Adding metadata to your file allows it to be found amongst other files much more often when using search software. Programmes such as Soundly and Metadigger allow you to input all of this information.
The essence of field recording is being one with your surroundings and connecting with the sound that the world makes. Your job is to explore and capture the beautiful audio that exists in this world. You want to achieve the best result you can. We hope this article has given you some great pointers. Go out and have fun recording sounds.
