

Discover the latest industry news and audio post production.
A review of the Dynaudio LYD-5 studio monitors, highlighting their forward sound, excellent stereo imaging, and suitability for professionals seeking accurate detail in a compact design.

November 23, 2021
Company: Dynaudio
Product: LYD-5
Price: £399 (Each)
Our Rating: 4.3/5
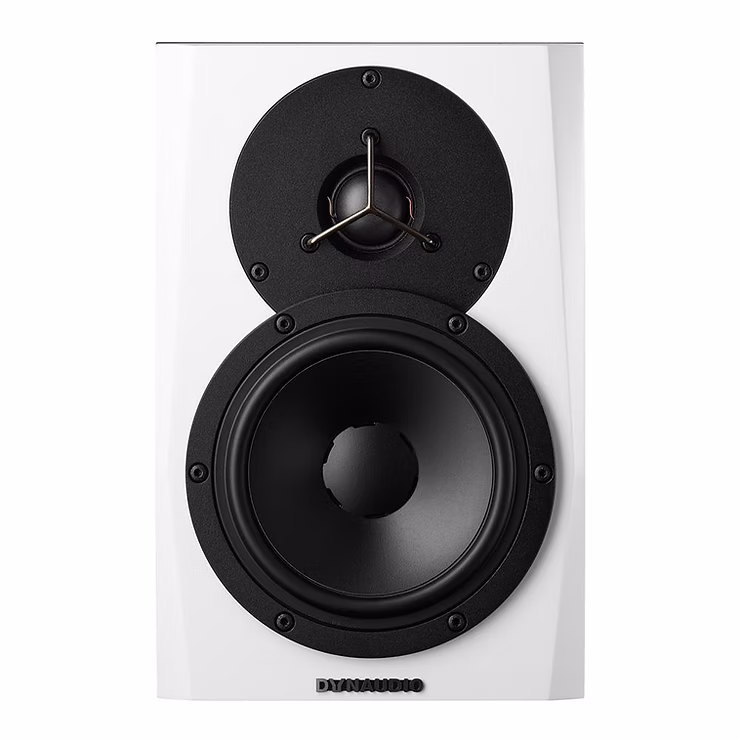
Dynaudio recently sent over a pair of their LYD-5 Monitors to test in our studio. Their Scandinavian look and sound can be found in studios across the globe, encompassing a lot of what is expected from a mid-range near-field monitor, and more.
Dynaudio have always had a reputation for great sounding monitors with a distinctive look (particularly their BM range). Post Production studios / Editing Rooms are often kitted out with surround systems that take advantage of their warm, low end heavy sound.
But Dynaudio are now faced with a dilemma, keep making the consistently popular BM range, or continue to develop new products for the next generation of Sound Engineers and Sound Designers?
Here comes the LYD range to the rescue with it's smallest member. LYD-5 is Dynaudio's answer to developing a product that is more marketable to the new wave Professional or Semi-Pro user who wants accurate detail in a small package. They look great in white, and really draw attention to themselves with their B&W aesthetic.
So how do they sound? Very forward. The stereo image is fantastic and really doesn't smear. The directional sounds in a music or post mix can be positioned with high accuracy. In terms of frequency response, they are quite similar to the Genelec 8030's, but with perhaps a less harsh response. They feel very close due to the presence range being upfront and focused, and a sound that is not very heavy in low end. Transient response is also accurate, clear and doesn't feel over pronounced. Larger models will be needed for extended frequency response without a sub.
Overall, LYD-5s are very different to our usual favourites, the HEDD Type 05s. But as we are currently building our second Sound Design room, we may pick some up so that we have an additional reference for mission critical film and commercial mixes. In this price range, alternatives would be HEDD, Genelec and Neumann.

A review of RT Sonics' Cinematic World, a powerhouse sound effects library packed with high-impact, AAA-quality sounds designed for trailers, game audio, and blockbuster productions.

November 23, 2021
Company: RT Sonics
Product: Cinematic World
Price: $49.50 (Usually $99)
Our Rating: 4.8/5
RT Sonics are back with another epic sound effects library. Their latest offering, titled Cinematic World is a versatile and heavy hitting library that is tailored to delivering heart stopping, larger than life sonic moments, perfect for trailer sound design and use in AAA projects.
As the name suggests Cinematic World provides you with a large arsenal of sounds that will add a cinematic, grandiose edge to your productions. This diverse collection offers audio professionals a complete palette of tools for modern trailer sound design, game audio and beyond.
In their own words: "This library is designed with one thought in mind – to provide AAA quality and innovation."
Cinematic World is consistent with the sonic quality you would expect from RT Sonics. Audio fidelity has been taken to the next level and the quality of the sound design is stellar, both on an aesthetic and technical level.
Expect to find big, thunderous sounds, with wide frequency content and crisp production that would be at home in a Hollywood blockbuster or a AAA game.
Cinematic worlds contains over 600 premium sound effects. All sounds have been recorded with professional high-end equipment, including Sound Devices 788 with ORTF setup of Sennheiser MKH 8040’s and MKH 8050 to name a few. The quality of the recordings are pristine and you really get the sense of this library being a "level up" from the competition when going through the sounds. All files come in 24 bit wav format, 96 kHz allowing for further audio manipulation.
This library supplies you with both designed and source folders for maximum creative freedom. Like with their previous library Nuances of Fear, The team at RT sonics have clearly gone out of their way in both the recoding, editing and processing to deliver the best material possible, and give sound designers the finest sonic ingredients to work with.
Some of the variety of sounds you will find in this library include:
Sub bass booms
Drops
Heavy impacts
Pulses
Whooshes
Metal Impacts
Low Hits
Braams
Stingers & Sci-Fi build ups
Stutter build ups
Atmospheres
Pings
Risers
Besides the obvious inclusion in trailer sound design projects, Cinematic Worlds lends itself to brilliantly to many different styles of modern media.
The wide range of sounds on offer make this library especially useful for projects in more "design heavy" genres such as sci-fi, action and fantasy. Given the high-energy, high impact nature of the sounds in this product, We also think it would be ideal for use in sports promo videos, montages, product demos and online advertisement. We would use this library to beef up transition effects, stingers and big impact moments.
We also think that the sounds in Cinematic world would benefit from being Partnered with some ambiences to help emphasise the magnitude of the sounds and make them even more colossal.
Check out the epic trailer for Cinematic World.
Cinematic World offers a vast collection of sounds for the price tag. The calibre of the sound design is superb, and the inclusion of both designed and source sounds gives you maximum creative freedom when working with this library.
“RT Sonics' libraries are awesome and irreplaceable - not only do they feature ready-to use-designed assets that stand out from the crowd, but also have immaculately recorded construction kits that I keep coming back to! You can tell that these libraries are created by sound designers, for sound designers.” - Alex Previty Sound Designer Audio Lead | Spider-Man (PS4), PlayStation.

A review of Accusonus Voice Changer, a user-friendly and versatile voice manipulation tool designed for filmmakers, content creators, and sound designers looking to craft unique character voices with ease.
November 23, 2021
Voice manipulation is a crucial part of sound design, with genres such as sci-fi, fantasy and horror relying heavily on voice effects to create the sound of the characters contained with the stories. In our latest review, we checked out simple yet potent voice manipulation tool Voice Changer by Accusonus.
Company: Accusonus
Product: Voice Changer
Price: $4.99 per month subscription
Our Rating: 4.5/5
Voice Changer is a new voice manipulation tool from Accusonus. Whilst there are many products of this kind available on the market right now, Voice Changer has clearly been designed with a strong focus on storytelling, characterisation and ease of use, which helps to set it apart from the rest of the pack.
We tested Voice Changer on a recording of an actor reading "Twas the Night Before Christmas" and we found it incredibly fun switching between different presents, and hear the voice quickly change through various iterations.
This plugin combines a simple interface with a diverse cast of characters, and environments to choose from, giving users a versatile and powerful sound design tool that lets you get creative with minimal fuss.
In their own words:
From epic movie trailer tones to subtle whispering, evil AI voices to baby robots. An alien, a dragon, a monster, a ghost, a giant… Quickly modify your voice, and create anime voice filters or scary voices. Use vocoder effects and morph your character into a robot, a girl, a man, a woman, a baby or anything you want.
The introduction video to Voice Changer from Accusonus.
In terms of ease of use, with a grand total of 3 adjustable parameters Voice Changer couldn't be any simpler. Users can quickly cycle through the bank of useful pre-sets to find the effect they are looking for, and then apply further tweaking from there.
The 3 adjustable parameters offered in Voice Changer are:
Character - Selects through a range of different character effects which alters the pitch and tone of the voice recording.
Effect - The effect parameter controls the timbre and type of processing that is applied to the voice and makes the voice more robotized, organic, alien, futz etc.
Environment - The environment parameter controls the location that the voice is in, and can be used to make the voice sound more distant, close up or in a large reflective space.
Laying out the plugin in this way makes a lot of sense and should be very attractive to novice -intermediate users who are unfamiliar working with more complex voice manipulation plugins.
The character module of Voice Changer is explained in the video above.
Voice Changer will be widely applicable across a range of audio scenarios where the manipulation of the human voice is called for, including for use in films, animation, radio dramas and video games.
Due to its accessibility and ease-of-use, Voice Changer is especially well suited to filmmakers and content creators who would be uncomfortable working with more advanced audio tools.
We would use this plugin for the following tasks:
- Designing a sci-fi, horror or cartoon characters voice.
- Placing a characters voice into a specific environment such as airport, courtyard etc.
- Placing a characters voice through a "telephone" or "megaphone" effect.
Voice Changer is a diverse and easy to use voice manipulation tool that offers users a large range of creative options. Its focus on accessibility both in its operation and price make this a great purchase for more novice users and audio professionals in the early stages of their career.
Due to its simple design, Voice Changer will also be especially useful to users who are not used to working with pro audio tools such as filmmakers and content creators.
We hope you enjoyed checking out this review!

An in-depth look at Pro Tools' new Dark UI theme, weighing its benefits and drawbacks to see if it enhances workflow or presents new challenges for users.
November 23, 2021
Welcome back to the 344 Audio Blog. This week we are taking a look at the new dark UI theme that has been added to Pro Tools in the latest update.
The addition of a Dark UI marks the first time that any significant aesthetic changes have been brought in with a new Pro Tools update. Other DAWs such as Logic and Ableton have had this option of light and dark themes for a while, so perhaps this addition was seen as a way to bring Pro Tools in line with these other programs.
The new dark theme is very easy on the eyes and will surely be welcomed as a positive addition by large portions of the user base. It's good to see AVID giving the users more control over their own experience and this addition could lead to similar features being implemented if it is well-received.
Changing between the classic and dark themes couldn't be easier. Once you have downloaded Pro Tools 2020.11, and opened a session, simply go to your preferences > display > UI Theme. Then you can choose between a 'classic' and 'dark' mode in the drop-down menu.
Switching UI themes will require a restart of pro tools so just keep that in mind when you are making the switch.

You can find a more in-depth guide in this video from AVID.
The dark theme is much softer on the eyes, making it better for longer sessions, working in low light studios, or conducting late-night work/ remote sessions with artists in different time zones.
The sleek and modern aesthetic may help session navigation and make certain panels and menus stand out more.The dark theme may be more familiar to users of other DAWs such as Logic or Reaper, and encourage these users to work inside Pro Tools.
Having to restart Pro Tools each time you switch between themes is quite frustrating, and will certainly irritate a lot of users. Perhaps in future updates, AVID may remedy this but for now, we will be stuck with having to restart each time.
Another potential issue with the new theme is how accessible it is to users with colour blindness, and whether the dark theme will help or hinder those users.
In our humble opinion, the new dark theme looks great and is certainly a welcome addition to Pro Tools. Any additions that give the user more control over their experience is always a win in our eyes, so we hope this may lead to similar additions in future updates.
You can find a full breakdown of all the new Pro Tools additions via this link below:
http://www.avidblogs.com/whats-new-pro-tools-2020/
We hope you enjoyed checking out this article!

A comprehensive review of SoundQ by Pro Sound Effects, exploring its features, usability, and value as a sound library workflow tool for audio professionals.
November 23, 2021
Here at 344 Audio, we are always on the lookout for new tools that can help us operate more effectively. Today we are delighted to share with you our review for SoundQ, the new sound library workflow software from respected sound effects developer Pro Sound Effects.
In this review we will take you through some of the key features and benefits of this software, and give you our verdict on whether you should make SoundQ a part of your workflow.
Company: Pro Sound Effects
Product: SoundQ
Price: $9.99 per month
Our Rating: 4/5
In the world of audio post-production, having a smooth and efficient workflow is something that is hugely important, and when working on commercial projects there simply isn't enough time to be combing through vast sound libraries to find that one sound effect that you are looking for.
This is where an integrated sound library workflow software such as SoundQ comes in, as it organises and catalogues all of your sound effects for you in both local and cloud storage, and makes searching and navigating incredibly easy through metadata categories, and search terms.
Pro Sound Effects have previously ventured into the area with their sound library management software Search, which while well-received, was limited to the management of your local files only and lacked any cloud-based functionality. With SoundQ, Pro Sound Effects have built upon the lessons learned from Search, and brought across all of the positive features of this software whilst emboldening it with an expanded selection of features.
The pricing of SoundQ falls in to a 3-tiered subscription system, with greater functionality and less limitations for the user the higher you move up the tiers.

SoundQ's pricing structure as explained on the Pro Sound Effects website.
SoundQ comes with a range of really great features, not least of which being giving users cloud access to the entire Pro Sound Effects library of over 800k+ sound effects, which includes some premium products from industry legends such as Mark Mangini, Richard King, Ann Kroeber and more.. There are some slight limitations however as you only get a certain amount of download credits depending on what level of subscription you have. (Only the highest tier subscription SoundQ teams give users unlimited download credits.)
From a technical standpoint the program is well designed and has a very solid infrastructure with minimal load times to obstruct your creativity. Its essential that a workflow software such as this actually enhances your efficiency, and doesn't simply just add further steps in your creative process for the sake of being organised. Whilst the OCD amongst us may disagree, we believe that organisation for the pure sake of it is of little benefit unless it has a directly positive effect on the end product.
We really like the visual layout of SoundQ as all the information you need to see is clear and easily readable. The development team have been smart and have not tried to re-invent the wheel. Everything is basically where you would expect to find it which makes diving into this software for the first time an intuitive experience for users who have worked with any kind of sound library workflow software before.

SoundQ has a brilliant user interface that makes navigating and finding the sounds you want a breeze!

n their own words, here are some of the great features that users can expect from a SoundQ subscription.
The pricing of SoundQ is however slightly lower than a lot of the competition when compared the standard subscription to the equivalent package. You will just have to weigh up which best fits your personal needs and finances, as some users may prefer to pay a larger cost up front for a program such as Sound Miner as opposed to an ongoing monthly subscription.
One cool feature that we really enjoy is the ability to send clips directly into your DAW as seen in the image below. This is a really nice touch and helps to create an even more seamless process when auditioning and bringing sound effects into your DAW timeline, as is something that we are yet to see replicated anywhere else.

Transferring sound effects directly into your DAW. Here we have selected Pro Tools and the chosen sound will be imported as a clip directly into our session.
In our honest opinion, the main draw here are the Pro Sound Effects libraries that you get access to rather than the software itself. Whilst the UI is very nice to work with and the underlying infrastructure of the program is solid, when deciding whether or not to use this program over another in its class such as Soundly feels a little bit like apples and oranges, and there isn't enough about SoundQ as a software that makes it stand out from the pack. Perhaps future additions and refinements such as including a tier for single users with unlimited downloads will change this but for now we cant really say otherwise.
Check out this trailer video from Pro Sound Effects for an overview of what to expect from SoundQ.
Overall this is a very well designed piece of software that gives users some great functionality and access to a vast collection of top-notch sound effects libraries. We would have like to see a few more innovative features, but for the budding audio professional who is looking for a sound library management software, a standard subscription to SoundQ would be a very fine choice indeed!For a more detailed look at this SoundQ and all that comes with it, you check out its dedicated page on the Pro Sound Effects website: https://www.prosoundeffects.com/soundq/
We hope you enjoyed checking out this review!