

Discover the latest industry news and audio post production.

Boost your film compositions by understanding themes, experimenting, listening widely, recording live musicians, and learning post-production processes.

November 23, 2021
Film music composition is a diverse craft that is equal parts technical and artistic.
However, It can often be confusing for newcomers looking to get started in film music.
This article is contains 5 tips that will help take your compositions to the next level.
Every story contains themes and ideas that are communicated through the characters and their actions. For example, Harry Potter is filled with magic, suspense and action sequences, but ultimately it is a film about friendship and family. When composing for a particular scene, always ask yourself how it relates back to the central themes of the story.
If you know what the core themes of the story are, then you can use them to guide your composition. This will help to get ideas down quickly, and establish motifs that you can use throughout the film.
Make time in your schedule to experiment and explore new ideas. This can be anything from creating your own sounds, trying out new musical styles/instruments, or researching a new topic. This is not only loads of fun, but is a great way to use down-time in your calendar. Keep learning and seeking out new musical avenues. Make an effort to approach things from new and unique perspectives. This will keep your creative muscles in good shape for when a new project comes along.

Ask yourself - what do I bring to the table that cant be found anywhere else? By taking time to research and experiment, you are shaping your individual voice and perspective as a composer.
Here are a few research/experimentation ideas to try during your down-time.
- Research the music from another culture and create a composition
- Record household objects and create your own sounds from them
- Compose a piece using atonal instruments
- Research an obscure musical style/genre
- Create a composition only using sound produced by your mouth
As a film composer, it is essential to be familiar with a wide range of musical styles and instrumentation. You never know what the next project may require, so make an effort to listen to a diverse selection of music. You should aim to build up a database in your head of what types of sounds align with certain emotions. A director may say something like "I want it to sound gloomy/sombre". If you already know what kind of instruments and sounds are associated with a particular feeling, then you are able to deliver what they are asking for much quicker.

Study the music from classic films so that you can draw upon what other composers have done before you. Listen with an analytical mindset and think about the musical and sonic devices that are being used. Identify what techniques are most effective and integrate them into your own compositions.
We are living in an age where the entire history of recorded music is only a few clicks away. This is an incredible resource that film composers of yesteryear didn't have access to, so use it wisely! Listen to classical, jazz, world music, electronic, folk etc. Basically anything that will expand your horizons and provide you with new musical ideas.
Even with all of the digital instruments we have available, There's nothing quite like recording with real musicians.
Recording with live musicians will bring your music to life, and give your tracks a level of expression that just cant be achieved when working in the box. Not only will your music sound much better, but the process of arranging all of your parts and hearing them performed is extremely satisfying, and will give you a deeper appreciation of your music. Planning and carrying out a recording session is also a great way to practice your people management skills, and will give you a glimpse of what is to come when you are working with larger ensembles and orchestras.
If you are working with small budgets, don't be afraid to reach out to students at music colleges. They generally play to a very high standard, and will cost a lot less than a professional ensemble. Even if its just a violin or cello, record your parts with live musicians. It will take your music to the next level!
You don't need to know every little detail inside-out, but having general sense of the post production process will make your life easier when working on a film.
There are many different audio roles in film production, each with a their own specific focus. As a composer, its very useful to know what all of the roles entail, and how your music fits into the bigger picture. You need to know what will happen to your music once it has been delivered for mixing, and how the mix engineer will balance your music against the other sonic elements in the film (Dialogue, Foley, Sfx etc).
Demonstrating this knowledge shows a level of professionalism, and will put you ahead of the competition when pitching for projects.
We hope this article has given you some great tips. Have fun composing music for your projects.


A structured process for creating professional sound effects libraries, from concept to final release, ensuring quality, efficiency, and market appeal.
November 23, 2021
Creating a sound effects library is a task that combines creative thinking, technical execution and project management skills. At 344 Audio we have developed an efficient and effective process that has been honed over countless releases and allows us to consistently generate new content over time.
In this article, we will share this process with you step by step, and give you all the tools you need to start creating your own sound effects libraries.
The first thing you need to figure out when creating a sound effects library is the concept. This can be anything you want, but it helps to focus on a certain theme, aesthetic or type of sounds that work together.
Some previous examples of our library concepts include:
Practical Doors - Practical Doors contains a range of interior and exterior door sound effects with common uses: open, close, creak, slam, keys, locks, latches, knocks and many more!
Trailer instruments Designed - Trailer Instruments Designed contains a variety of effects captured from instruments and manipulated into impacts, drones, stingers, risers and more.
The Burger Kitchen - The Burger Kitchen contains a wide variety of food preparation, eating and handling sounds captured in our foley suite.
As we can see, these libraries each have a unique theme and focus on different kinds of sounds, and would be useful in different contexts. Having a solid concept is key as it not only gives you boundaries to work within, but will help add some personality to your library and help it stand out in the marketplace.

Once you have your concept nailed down the next step is to decide on the structure of your library. This means how many sounds will there be in total? How will you organise the sounds within the library and how many subfolders will your library contain?
Let's use an "Impacts Library" as an example
80 files in total
Folder 1 - Electronic Impacts - 20 Sounds
Folder 2 - Organic Impacts - 20 Sounds
Folder 3 - Designed Impacts - 20 Sounds
Folder 4 - Crazy Metallic Impacts - 10 Sounds
Folder 5 - Sub Impacts - 10 Sounds
Using this structure as a reference, you can make a list of sounds that you will need to record to build the library.
Structuring your library in this way breaks up the content and makes it easier for the user to find the sounds they are looking for. It also helps you during the recording and editing phase as you know exactly what you are working towards in terms of the number of sounds and what is in each subfolder.

Now we are getting to the fun stuff. The recording phase is where the magic happens, so it's crucial that you get this stage of the process absolutely spot on!
A few things to consider before you begin recording are:
What kind of sounds are you recording? Are they more external "field recording" sounds or are you able to capture them in a controlled studio environment?
Do the sounds need to be in mono or stereo? Mono is most common for "spot fx" and stereo is more commonly used for atmos, or sounds with an inherent spacial element to them such as a car passing left to right, trains going past etc.
What kind of microphones and pickup patterns will you be using? Dynamic, Condenser, Shotgun, Cardioid mic etc.
Are the sounds being processed heavily during the editing & design stage?
Once you have given this some thought and have decided on your approach, it's time to start making some noise. Whilst the recording stage can most definitely be completed by one person, it is much easier when there are 2 people doing it, as one of you can take charge of recording whilst the other can "perform" the sounds. We recommend working in a team of 2 for maximum speed and efficiency during this stage of the process.
Operating as a pair, work through the list of sounds that you wrote during the structure phase until you have captured all of the source material that you need in order to build the library. As a general rule it's always more favourable to have too much source material over not enough, so make an effort to capture as much as possible. By taking a little extra time and capturing as many sounds as you can you will be giving yourself the most amount of content to work within the editing & design phase.

With the recording complete it's now time to move into the editing and design phase. This is where you will take your raw source material and start bringing them to life, either through editing or additional design and effects processing.
When editing your sounds, it's important to consider the end-user and in what context they will be using the sounds. For example, when editing our Practical Doors library, we specifically made all of the doors have a consistent level and frequency content, so that they would all feel right when placed in a scene together. You should edit your sounds in a way that makes things easy for the sound editor so that they can drop sounds into their project timeline and work within the scene with minimal fuss.
There is a lot more to editing than just chopping files, making fades and stripping silences. The editing phase is your chance to be really creative, and give your sounds that bold, dramatic feel that will make them stand out.
Some techniques to implement during editing include:
Play with extremes - Don't play it safe. Embrace large dynamics and make use of contrast between quiet and loud sounds to maximise their impact.
Heighten the drama - Try and edit your sounds in a way that conjures up an image, indicates some real-world physicality and motion or has a visceral effect on you when you hear it. For example, in our gore library "Slaughter" we were editing sounds for a human body being crushed. We spend a lot of time thinking about how this would actually play out in reality, and the different phase's of the body being broken down, skin, bones, blood, guts etc. Approach editing like this took our sound from "decent" to genuinely stomach-churning, which is exactly the effect a gore library needs to have.
Fill out the frequency content - Combine and layer different recordings together so that you can fill up the frequency spectrum and give each sound that big, bold weightiness that is so characteristic of modern movie sound effects. There may be instances where editing isn't enough and you must use effects processing to create the sounds required for your library. This is something we do quite often, especially on libraries with an otherworldly or Sci-Fi concept to them, or when we are constructing drones and atmospheres from everyday sound sources.
Some go-to processing methods that we love to use are:
Reverbs with long decay times.
Modulation effects - Flangers, phasers, chorus.
Crazy comb filters, LFOs and modulation delays.
Pitch and formant shifting.
Once you have completed the editing and design and have your effects sounding just as you want them it's time to move forward to the quality control phase.

The quality control phase is super important, as it is your last chance to address any errors in your library before release and make sure that everything is sounding perfect.
Firstly, you can export all of your edited and designed sounds out from your DAW and organise them into separate folders using the structure you came up with earlier. Once you have this done, listen through all of your sounds from start to finish and be attentive to any technical or aesthetic issues as you go. These may be things such as excess silence in the file, unwanted clicks and pops and sounds being cut off from improper fade ins/outs. Make notes as you listen through and then make any adjustments needed to the sounds which have unwanted elements or errors in them.
Most common issues can be avoided by paying close attention during the recording and editing phases, but it's always worth double and triple-checking in case any unwanted sounds have slipped through the cracks and made it all the way to this stage without being flagged up and corrected.
Once you have checked through all of your sounds and are happy with everything it's time to embed metadata into the files. Metadata are additional tags that you can attach to a file that makes it easier for people to find when they are searching through their sound libraries.
For example, we may have a bone-breaking sound called "Bone Break 01.Wav" but we would like to give it additional tags so that it appears in searches relating to "horror" and "gore".
There are several programs that will allow you to achieve this but we use the sound effects platform Soundly, as it has a great interface and is really helpful for organising your sound effects.Within Soundly, select the sound you want to add metadata, right-click and go "edit metadata". This will then bring up a window where you can edit both the file metadata and file originator (Author of the file, in our case 344 Audio). In the metadata section simply type your additional search tags each separated by a comma.
File Name: Bone Break 01
Originator: 344 Audio (In your case it might be "Johns Samples" etc.)Metadata: Bone, Break, Snap, Injury, Gore, Horror, Violent, Fall, Fracture
By adding the metadata it makes it much easier for the user to find your sounds and gives them a little bit more information about the context in which to use them.

The final stage before releasing your library is to create some killer artwork, write up an enticing description for use on online stores, and make a demo track to show off your library and get people hyped up.
Artwork - We think its best to keep things simple and consistent when it comes to artwork. Use an online tool to create some custom graphics that can be saved as a template for use across your future library releases. There is a range of awesome websites that allow you to make custom graphics. We use Adobe Spark as it has a large range of stock images to choose from and a user-friendly interface.
Choose a background image that links to the concept of your library and then overlay some text with the name of the library. You can then finish it off with your company or brand logo in the corner to let your users know who the library is from.
Descriptor - This covers all of the text that will be used to help sell the library and is broken down into product tagline and product description.
Your tagline should be short, sweet and enticing. Try and write something that will whet the appetite of a potential customer and get them intrigued about the sounds in the library. Our tagline for "British Soldier Voices" - "British Soldier Voices contains 800+ soldier vocalisations including orders, commands, shouts, grunts and more performed at different intensities. All recorded up close and personal for use in video games, film and other media content. Recorded in 24Bit 96kHz, allowing for further sonic manipulation."
Your product description goes into more detail and explains to the customer exactly what is contained within the library, and some specific technical information such as the number of files and sample rate etc.
Our product description for "British Soldier Voices" - Phrases include genuine language used by SAS, Army, Royal Navy and Paratroopers as well as exaggerated script elements. We consulted real British Armed Forces Personnel to ensure that our scripts were accurate and performed correctly by our voice talent. Both modern phrases and historical phrases are included, extending the libraries use beyond modern warzones.
Whether you are making an FPS game featuring the SAS, a film featuring the armed forces or need voice effects for training purposes, this library covers both real-life commands as well as phrases included for dramatic effect. All lines are included clean along with a processed version to add quick army radio comms to any project, perfect for video game implementation!
If you think your sound collection is in need of some reinforcements then this is the library for you!
Here are the included folders:
Whispering: Perfect for stealth mission and special forces operations, using the element of surprise.
Talking: Soldiers speaking at normal levels, perfect for instructing commands or for training exercises.
Shouting: Perfect intonation for heavy battle in close proximity with the enemy, lock and load!
Grunts: A collection of grunts and efforts perfect for close-quarters combat or when a soldier is hit.
Specs: 1600+ files • 1600+ sounds • 24 Bit / 96 kHz | 16 Bit / 44.1 kHz • 435 MB • Includes metadata
Demo Track - Most people are going to want to listen to some examples of the library before making a purchase, so here is where the demo track comes in.
The demo track should be about a minute in length and show off the full range of sounds within your library in an interesting and exciting way. Be creative and try and create something that is fun to listen to and links back to the concept of the library. Try and give your demo track a sense of rhythm and that it is building towards a climax. Even if the sounds in your library don't have a musical quality to them, injecting a bit of rhythm and bounce to your demo track will help your library stand out and give the potential customer a positive impression.

Whilst we have given you our step by step process in a general sense, below are a few extra tips that will help you turbocharge your workflow and generate consistent results over time.
Teamwork is king - There's nothing that you can do alone that wouldn't have been done in less time and to a better standard than in a team. Develop a team of people to work on your libraries and you can complete a more diverse range of projects in less time than alone.
Break up the workload - Split the different stages of the process amongst the different members of your team. Whilst one person is recording someone else can be preparing the pro tools session for editing. Or if one person is editing someone else can be writing the descriptions and creating the artwork.
Develop a repeatable process - It sounds like a no-brainer but develop a process for creating sound effects libraries that you can repeat time and time again. This way no matter what the concept or content of the library is, everyone will be on the same page and know where they are up to in the process, and what stage comes next.
Be consistent - By keeping things consistent you will be able to produce content as faster speeds. By working in the same studio, following the same step by step process with the same team of people and equipment you are eliminating unknown variables and will over time become a well-drilled and efficient unit.
We hope you enjoyed this article!

A powerful and versatile pitch-shifting plugin, Pitch Monster by Devious Machines offers granular, formant, and vocoder engines, making it perfect for sound design, music production, and live performance.
November 23, 2021
Company: Devious Machines
Product: Pitch Monster
Price: £59.99
Our Rating: 4.7/5
Pitch Monster is a new pitch-shifting plug-in from Devious Machines. With its granular, formant and robo-tastic vocoder engines, Pitch Monster goes far beyond ordinary pitch shifting. Pitch Monster offers the user up to 8 voices of polyphony across a 6-octave range. Each voice can have 8 voices of unison, giving you a maximum potential of 64 voices. This tool provides a huge amount of creative options when it comes to pitch processing.
At the heart of this plugin are the 3 processing engines, granular, formant, and vocoder, each spreadable over pitch and time. The granular engine has a very smooth sound and is great for more basic pitch-shift effects, whilst the formant offers the more alien and otherworldly results. The vocoder engine is perfect for those robotized vocals and can be controlled by midi in real-time. The pitch/time spread features are great additions, and offer further possibilities for sonic exploration. Use them in tandem with the unison for fat, rich sounds that fill the stereo image. There are also dual high/low pass filters for further shaping and control.
Film/game audio designers will want to pick this product up, as it is perfect for sound design for the human voice. With a few clicks, you can easily transform a voice into a completely new gender or species. This plugins powerful formant engine also makes it well suited to designing robotic and metallic creature sounds and will be an extremely useful tool for sound designers working on sci-fi projects. Go extreme for the full robotic/alien effect, or be sparring to add subtle enhancement and presence. We think some really cool things could be done when mild processing is used in combination with filters, futz fx. For example the sound of an astronaut's radio communications, or a hologram transmission, etc.
As well as for use in sound design, Pitch Monster is great for use in electronic music production, or any style that involves a lot of vocal tracks. This plugin would also be a good option for live performance, given its vocoder and real-time midi capability.
This plugin responds well to a range of different sound sources and is great for adding a sense of movement to static elements of your track. Use it to on a mono synth to make chords, create pitch movements in hi-hats, or automate the pitch spread to create intense build-ups.
We will use this plugin to design crazy robotic/alien voice effects and to mangle sounds into new and exciting variations.
Pitch Monster packs a large number of features for its price, and the quality of the pitch shifting is very impressive. The effects that can be produced are fantastic, and the GUI is very easy to work with making this product suitable for beginners and professionals alike. Devious machine really have unleashed a true monster with this plugin!

Discover the top five voice manipulation plugins that transform the human voice into everything from subtle enhancements to extreme, otherworldly effects.
November 23, 2021
Since the early days of filmmaking, sound designers have searched for new ways to warp and transform the human voice. Think Darth Vader in Star Wars or the Daleks in Doctor Who. It has always been a challenge to give a voice to these not-quite-human characters, but luckily, now we are in an era where there are a wide range of tools to choose from. In this article, we go over our choices for the best voice manipulation plugins.
Tonsturm - FRQ Shift
First up we have FRQ Shift from German company Tonsturm. FRQ Shift is a pristine sounding, artefact free, dual-frequency shifter engine, offering everything from gentle modulation and stereo enhancement to more intense and alien effects. FRQ Shift not only sounds fantastic but offers a huge amount of flexibility and creative freedom when it comes to designing your own effects, thanks to the inclusion of modulation banks and its feedback matrix.
Devious Machines - Pitch Monster
We reviewed Pitch Monster a few months ago and it has quickly become a personal favourite of ours. The clarity of the pitch shifting, combined with its 3 separate engines makes this a powerful tool indeed. Pitch Monster is extremely versatile and can yield some incredible effects when pushed to its most extreme, or when used subtly. This product excels at creating heavily processed voice effects that still sound natural and smooth.
Krotos Audio - Dehumaniser 2
Dehumaniser is a modular, node-based voice processing tool that is especially suited to creature sound design. This product is amazingly simple to operate, even when using its more complex functions. The extensive pre-set banks make find the right effect as easy as possible, especially useful for those who don't want to spend ages tweaking. Dehumaniser comes with 2 options: either run pre-recorded audio samples through it or use it as a live performance tool. In live-performance mode, Its effects are heard in real-time, allowing voice talent to instantly react to and be inspired by what they are hearing.
Waves - Morphoder
Waves' Morphoder may not be as recent as some of the other tools on this list, it still packs a mighty punch. Morphoder offers you the classic sound of the original Vocoder synthesizer with all the flexibility of a digital plugin. Whilst the vocoder effect may be most known for its use in dance music, it is also capable of some truly spine-tingling and horrifying voice effects.
With a ton of adjustable parameters and sonic possibilities, Morphoder gives you the freedom to create some really unique sounds and shape the voice with clarity and precision.
Zynaptiq - Morph 2.0
Morph 2.0 is a fun and easy to use tool for creating interesting soundscapes and crazy voice effects. This product allows real-time morph processing between 2 input signals, and offers the 5 different morphing algorithms to choose between, giving the user highly detailed control over the effects. Housed inside a deceptively simple GUI, this sophisticated tool will have you effortlessly creating out-of-this-world results from the most ordinary of input sources. Whilst Morph 2.0 can be quite taxing on your CPU, it more than makes up for it in the clarity of its sounds and its features.
We hope you find this article useful and have fun using these tools in your projects.
Explore five free Pro Tools plugins that offer creative ways to manipulate sounds for sound design, from sci-fi effects to robotic tones.
November 23, 2021
As an entry level Sound Designer it costs a lot of money to get your hands on the plugins that top sound designers use. However, Pro Tools offers a handful of unique plugins that are native and effective for high level sound design.
This article highlights five plugins that you can use to manipulate your sounds in unique ways. Not only will we state what plugins are great but what they are also great for designing.
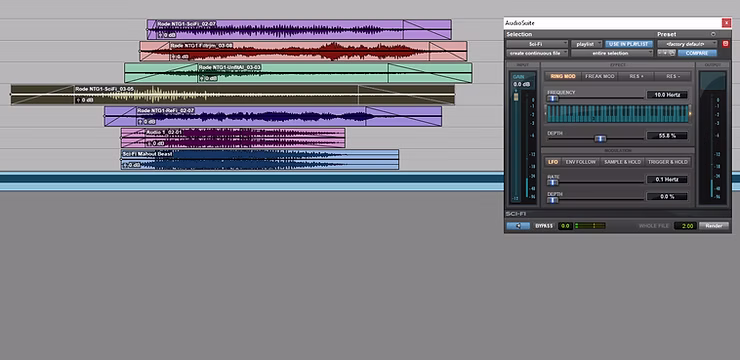
Sci-Fi is an amazing modulation plugin that invites creative freedom in making out of this world sounds. With ring modulation you can add in-harmonic timbrel additions to the base of your sound to create a broken and jaded feel. Freak-mod is the more alien of the modes available adding a crazy random character to your sound design.

All of the effects have dynamic control with the envelope follow, LFO, sample & hold and the trigger & hold functions. This plugin is very useful for spaceship and alien world design.
AIR Multi-Chorus on the face of it, seems like a very basic chorus. This is until you use the voices knob where you can achieve really wide pitch digression either side of the original. With this you can achieve even thicker and wider choruses.
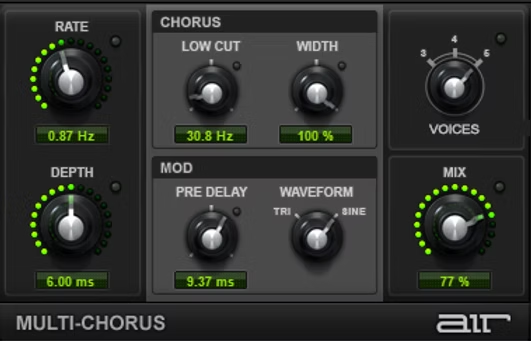
With the low cut and mix knobs, there is a lot of lenience of vocalisation integration with a lot of control. This plugin is great for inhuman and very large sci-fi vocals.
Lo-Fi is a bit reduction plugin that reduces the sample rate and sample size to introduce interesting artefacts to the original sound. Many people associate these sounds with robotic and electronic sound design elements, and it is so easy to input anything and make it sound robotic.
Additionally you can add noise, saturation and distortion to colour the sound differently. This plugin is most certainly most suitable for circuit, robot and electronic sound design.
Recti-Fi is an amazing and undermined harmonic plugin available to use amongst native Pro Tools. This plugin allows you to add or subtract harmonic content of the original sound to achieve an array of spectrally different sounds. For example, having a low filter in alternate mode gives a very 'thrust-like' sound whereas an all-pass in negative has an adverse effect.
When used in conjunction with with the original sound, the effected sound acts as so much weight sub-fundamental frequency. This plugin is more suited to messy sustained sounds rather than intricate, transient rich sources where this can be quite destructive.
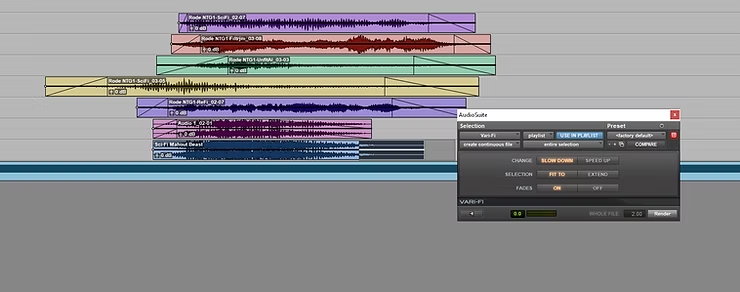
Vari-Fi is an amazing pitch shift plugin that hides away in Audio-Suite. This is because it requires and audio selection to render a new audio file and cannot do real-time slow down or speed up renderings. Vari-Fi allows whatever audio you have selected to be sped up or slowed sown within or beyond the edit-window selection.
Whereas the functions of this plugin stops here, it is beautifully effective at what it is does. This is useful on music for simulating a tape-stop or for a machine powering up or down.
"It's not the tools that you have faith in - tools are just tools. They work, or they don't work." -Steve Jobs