

Discover the latest industry news and audio post production.

Craft immersive film backgrounds with layered soundscapes, smooth transitions, subtle foreshadowing, and low-end depth for a rich, dynamic atmosphere.

June 8, 2022
Background sound effects are the essential building blocks of a successful scene. These sounds build worlds around characters and compliment their emotions. Subtle changes in background elements foreshadow events and can build tension leading up to them. In this article, we will explain how we layer our scenes with a host of background elements and how manipulation of these layers provides sonic interest that is often felt rather than heard.
When designing backgrounds, we like to aim for eight different layers. As sound designers, it's important to remember that we have to accommodate sounds that the audience may never see. A good place to start would be using markers so you know where each scene starts and ends, to the frame. We will use a big city as an example... The obvious choices for sounds here would be traffic, people, crowds, and wind. The sounds that we can't see often make the biggest difference. For example, we could have birds, a church bell, police sirens, trains, rivers, plains or live music. Eight layers seem like a lot, but they get filled quickly!
It's always handy to have at least one mono background in a given scene so any discrepancies in dialogue can be masked. This is usually a quiet wind or room tone.
When changing scenes, the layers must fade into the next one by one frame. So, at the start of the shot, there should be a one-frame fade out from the previous scene and a simultaneous one-frame fade in for the forthcoming background effects. This isn't a hard rule, but we find this often gives us the smoothest transitions. Due to this, we checkerboard our backgrounds meaning that a total of 16 tracks are required for this process.

We tend to find that some background sound effects lack a low-end rumble, which is essential for filling space in a scene. Adding a pink noise layer to backgrounds with lots of mid/high content can solve this issue. Selecting a pink noise waveform in a signal generator and applying a low-pass filter can be the perfect space filler. A boost around 60Hz-100Hz usually helps to fill the low-end.

Don't be afraid to add subtle changes to your background effects to reflect or foreshadow certain events or emotions. For example, let's say that there's going to be a big explosion in a city. Adding a drone could be a great way to build tension. Background FX doesn't always have to be natural, sometimes a synthesised effect can complete a scene. Changes in level could also make the explosion more of a surprise. More experimental effects such as distortion could be used to build tension too. It's important to keep these changes subtle though as more obvious sounds would be dedicated sound effects.

Discover five classic microphones that have earned their place in sound design and Foley, offering unmatched quality, versatility, and reliability.
May 6, 2022
Microphones to sound designers are what paintbrushes are to artists. They are an essential tool in our creative arsenal, and as audio post professionals its crucial that we have a wide understanding of different microphones, particular those so heavily favoured by the industry.
In this article, we share with you 5 tried-and-tested microphones that have stood the test of time and earned "classic" status.
First up on this list we have the NeumannKM184. Billed as "The universal microphone for studio and stage applications", the KM184 is revered for its transparent sound, compact design and most importantly its modest price tag.
This mic is beloved by sound designers and Foley artists for its full-frequency response, lack of colouration and for its reputation of punching above its weight for its price class. The KM184 is also a staple in the world of film music, becoming one of the "go-to" spot microphones for orchestral recording.

There have been several re-issues of this mic over the years, and by spending some time searching online you can pick up one of these second hand for a very good price indeed!
https://www.neumann.com/en-de/products/microphones/km-184-series-180

Schoeps have made a name for themselves by consistently delivering premium recording equipment that pushes the envelope in terms of engineering and build quality. The CMIT product series is no exception. With truly stellar tech specs combined with an eye-catching blue paint job, this mic stands out from the pack and its clear to see why it is coveted by so many.
This compact, directional condenser mic has all of the qualities you would desire in a premium microphone. Its inherent transparency and low noise that makes it perfect for Foley applications and all of this comes neatly jammed inside of a lightweight 78 gram build.
https://schoeps.de/en/products/shotgun-microphones/cmit-series/supercmit.html

Our next microphone on this list surely needs no introduction. The Shure SM57 is a bonafide legend, and is perhaps the most recognisable microphone in the world next to its older brother the SM58.Sonically this dynamic mic does its job quite nicely, delivering solid and dependable performance over a wide range of situations. Whilst you wont get the clarity and crispness of a condenser mic, the SM57 excels at handling high SPL levels making it perfect for capturing explosive sounds.The main attraction for the SM57 is its robust design and low cost. Its not always the most expensive or flashy mic that is the best tool for the job. Sometimes its good to have some budget mics available, ones that don't mind taking a few knocks and scratches here and there.
https://www.shure.com/en-GB/products/microphones/sm57

Anyone who has spent any time at all in the world of audio will know the name Sennheiser. These German giants are no stranger to making supreme pieces of kit whether its their headphones, mics or wireless systems, and so we had high hopes for the MKH50.With a sound that is rounded, full-bodied yet naturalistic, coupled with its transparency and low noise make the MKH50 the apex in the world of Foley microphones. The MKH50 is beautifully designed both inside and out, and whilst aesthetics may seem like low priority when it comes to microphones, the MKH50 just looks so damn cool that we cant not mention it. We can personally vouch for the MKH50, having picked one up a few months ago it has become a favourite of the team here at 344 Audio and has featured on pretty much every project we have touched in that time.
https://en-uk.sennheiser.com/super-cardioid-condenser-microphone-studio-soloists-mkh-50-p48

The RODE NT4 is a mid-tier stereo condenser microphone that clocks in at around the £350 price mark, making it one of the most affordable mics in its class with no comprises on sonic quality.
What's great about the rode is that its truly plug-in-and-go. You only have to connect one microphone input and you are off and away. There's no messing around with multiple XLRs, stereo bars, phase alignment and measuring tapes, this mic simply does the job straight out of the box and gives you stereo recording capabilities with no fuss, perfect for busy sound designers. Whilst there are other mic models that also offer this, what makes the NT4 a classic is RODE's design quality. RODE have a rich pedigree when it comes to designing microphones for film and media purposes, and so you know that when you pick up an NT4 you are getting the real deal.
https://rode.com/en/microphones/studio-condenser/nt4
That wraps things up for this article. We hope you enjoyed checking our our list of 5 classic microphones of sound design and Foley.
Please consider subscribing for more articles like this!
This blog walks you through installing a hardwood floor in your DIY Foley pit, covering planning, securing joists, adding rockwool for sound control, attaching floorboards, and finishing with Tung Oil.
April 25, 2022
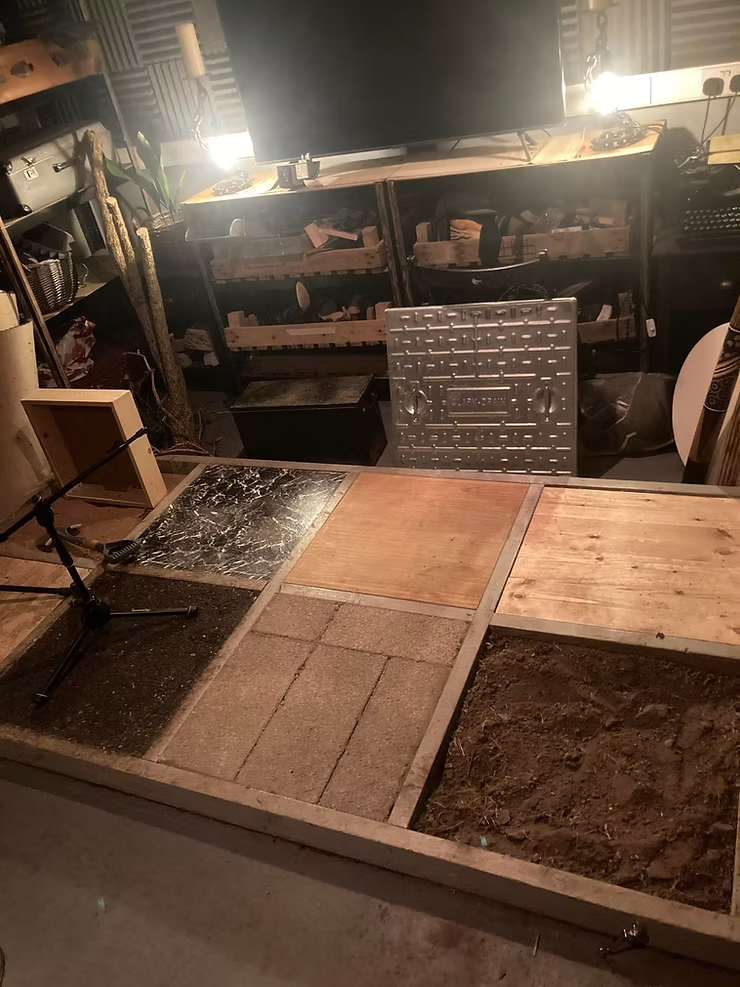
Continuing on from our last post about building your own foley pits, in this article, we’ll give you a short tutorial on how to install a surface into your foley pit.
Like with any project, pre-production is an integral part of the process. Working out the exact surface you want to create, it’s dimensions and knowing the materials and tools you’ll need is vital for tackling any D.I.Y. job.
For our surface we’ve chosen to build a solid hardwood floor in one of our 2x2 foot sections. For this we’ll need wood for the joists and floorboards, oil to treat the wood, rockwool, screws, a screwdriver, nails and my personal favourite a big hammer.
We went to our local wood merchant where the staff cut and sanded the wood for us, but if you choose to cut your own wood you’ll also need a saw/cutting tool and sandpaper to smooth out any rough edges.
Because we’re building a solid wood floor the joists are vital to create the strong sound of the surface.
We screwed 3 joists into the existing frame, but you could comfortably use 4 or 5 joists for a surface this size for even more stiffness
We than filled any gaps between the joists with rockwool to reduce as many hollow resonances as possible.
Be sure to use gloves and a mask when handling rockwool, this stuff is really itchy.

Now for the fun bit! Once the space is filled with rockwool, you can now start nailing the floorboards to the joists with a hammer. Use two nails at each point that a floorboard passes over a joist. Because have 3 joists each floorboard will need 6 nails.
TREATMENT: Once you’ve gone to town with your hammer and all the floorboards are fitted you can finish by treating the wood with oil. We used Tung Oil on our surface, this is a great organic oil that colours the wood beautifully.
Finally, once the oil has dried you’re ready to get stepping!
We hope you enjoyed checking out this article.
You can find part 1 of this article via the link below:
https://www.344audio.com/post/article-how-to-build-a-d-i-y-foley-pit
Stay tune for more educational content like this in future blog articles.

Boost your creativity with these 5 simple sound design tips to transform ordinary sounds into unique, cinematic audio.
March 28, 2022
Sound design is a discipline that offers a huge range of creative possibilities for storytelling. However, sometimes we can feel stuck or lacking inspiration and it can be tricky knowing where to go. In this article we will share with you 5 simple sound design tips to try when you are feeling stuck for inspiration.
Pitching is a classic technique for transforming sounds into something new. Not only can this effect be used for raising or lowering the pitch of a sound, but we can also use it to speed up, or slow things down. There are a ton of ways to play with pitch on your sounds and they each have a different tonal quality to them. Spend some time working with pitch to find out what sounds good to your ear and to be familiar with the different styles of pitch effects. Remember, if maintaining sonic fidelity is paramount then make sure the sounds you are working with have a higher sample rate, as this will deliver a smoother sound when pitching things up or down.
Some pitching techniques to consider on your next project are:

Use pitch effects to create interesting sounds from ordinary sources.
Its easy to get caught up in the latest flashy gadget or piece of studio gear, but don't forget that we all posses a complex sound creation tool in the form of our voices.
Your voice is perhaps your most potent weapon as a sound designer. No tool will allow you to produce ideas faster and with more variety, so don't overlook it.
Some examples of how to use your voice for sound design include:

Our voice is the synth we all own. Learn to master yours for creative sound design.
Often one sound alone doesn't quite cut it, so think about layering and combining sounds to achieve the result you want. Layering multiple sounds together allows you to create denser, and more full-sounding effects, as well as offering broad sound-sculpting possibilities. Perhaps you like the low-end of a sound but not the top-end? Use a low-pass filter and then layer the sound with something different that has the top-end you are going for.
Some textbook examples of layering include:

You can use multiple layers of sound to achieve the effect you want.
Some of the best sound design come from organic sound sources such as household objects and musical instruments.The material an object is made from will heavily influence the sound is makes, and different materials will each have their own sonic characteristics. Explore a wide variety of different materials and become familiar with how they behave in a sound design context.
Some of the different materials to think about include Glass, Metal, Wood, Rubber, Stone, Paper and Leather to name a few.

Study the work of sound designers you admire to help improve your own skills.
One of the best ways to improve your sound design and learn some new creative techniques is to study the work of those you admire. This means finding movies and scenes that you think have great sound design, and looking into the methods and practices that were used to create them. If possible try and track down some "making of" content that features the sound department. Many blockbuster films such as The Lord of The Rings and Star Wars have extensive behind-the-scenes videos showing the sound design and sound mixing process in depth.
Some classic movies to study for great sound design are:
That wraps things up for this article, we hope you enjoyed checking out these tips! Please follow our socials via the links below to stay up to date with our projects.

A deep dive into essential dialogue processing techniques, exploring methods for futzing and worldizing dialogue to create immersive, authentic soundscapes in film and media.
March 7, 2022
There are many instances in film where a characters dialogue needs to sound like it is being transmit through an object in the world of the film. Characters talking through a mobile phone is the most obvious example, but for more diverse examples you can think about a military commander coming through a radio, a TV news host speaking through a television, or a prison guard making an announcement over a PA system. These moments are crucial sound design elements that draw the audience into the world of the film and immerse them in the story.
In this article we will explore some dialogue processing techniques that you can implement to give your dialogue the feeling of coming through Tape, Telephone, Television, and Radio / Walkie Talkie.
Read on below to discover more!
This is probably one of the less common challenges you will come across but it does come up now and again. How can you make dialogue sound like it was recorded on tape and has that vintage feel?Well luckily there are a range of great tape emulation and saturation plug-ins out there.
Waves Kramer Tape - Waves Kramer Tape sound fantastic and gives you full control over how extreme you want your tape effect to be. There are wow and flutter controls for more heavy effects, and it also includes precise control over the level of tape noise and tape speed.
https://www.waves.com/plugins/kramer-master-tape#eddie-kramer-on-the-kramer-master-tape
Avid Reel Tape Saturation - In their own words, Avid's "Reel Tape Saturation emulates the colour characteristics, tape compression, and saturation effects of popular analogue tape formulation". This tool has a great range of presets and is fairly easy to get to grips with without too many parameters to choose from.
https://www.avid.com/plugins/reel-tape-suite
Soundtoys Decapitator - As the name would suggest, this plugin is more of a "heavy hitter" than the previous two, but it will give you a huge palette of different kinds of saturation to play with.
https://www.soundtoys.com/product/decapitator/
If you didn't want use a one-stop plugin and would rather create the effect from scratch you can follow this basic recipe. - Subtle EQ. Roll off the top end to darken, Slight boost in the lows/lower mids.- Apply gentle compression with a ratio of 2:1 to smooth out the transients and mimic the softening effect of tape.- Use a mild distortion to add harmonics and a vintage character to the dialogue.- Layer with a small amount of pink noise/tape noise for a subconscious tape feel.- Finish with a final colouring EQ to shape the overall tone of the dialogue. Think warmth, vintage etc.
This is probably the most common task you will face when it comes to futzing dialogue, given how often telephones are used by characters to communicate.
Generally speaking, you can achieve the telephone effect by making use of a drastic notch EQ as shown in the images below. These EQ settings sharply remove both the high and low frequencies, whilst giving a strong boost in the 250Hz - 5 kHz range.
.avif)
Two slightly different phone EQ settings in Pro Tools' 7-band EQ.

Some general things to think about for each of the common types of phone include:
Mobile Phone - Use a steep EQ curve and narrower bands to suggest a colder, more digital feel. Also worth considering is the phone signal strong or do we need to add some slight degradation to the dialogue?
Landline - Warmer and more homely feel. Employs a gentler EQ curve and contains more low-mid frequencies.
Payphone - Similar to landline but with a more industrial feel. More top end and perhaps some compression to "Squash" the dialogue and make it feel like its coming through a cheap phone speaker.

Characters speaking through television is another common situation that you may face when working on a film.
Much like the telephone as shown above, achieving a television effect is most easily done through the use of EQ.
Retro/ Analogue TV - Roll off some top and bottom end frequencies whilst applying a boost to the low mid range. A retro TV set works by receiving radio signals via its aerial, and therefore, we may also need to convey that the TV has a weak signal, with static, distortion or other interferences with the audio. To create this effect we can make use of effects such as lo-fi/ bitcrush to degrade the quality of the signal, as well as subtle flanger, tape flutter effects to suggest a compromised signal.
For extra depth you can try layering in a high-pitched tone such as the one shown in the video below.
Modern Flat Screen TV - A modern TV works via digital broadcasting and therefore doesn't not have many of the sonic features that make an analogue TV so distinct (Aerial, static, fluctuating signal etc.) However much like the mobile phone example in the previous section, we can make use of EQ to convey a slightly digital feel to the sound. You can roll of the top end frequencies more gently than you would with a retro TV sound effect to make it feel more modern. You can use the EQ setting below as a good starting point for both retro and modern television effects, but generally we are taking a similar approach as with the phone EQ only far less drastic. Here you can see we are rolling off the top and bottom end whilst focusing on the mids.

A Television Speaker EQ setting from Pro Tools' 7-band EQ.

Radio and Walkie Talkie effects are very common in movies, especially in the action and police genres. We may also need to create a vintage radio effect if we are working on a historical film, or documentary with flashbacks and re-enactments. Some processing techniques for achieving these sounds include:
Vintage Wireless Radio - 1920's - Use a fairly drastic notch EQ with a sharp removal of both the highs and lows. Focus on the 350 Hz - 4 kHz range. You can also play around with lo-fi and distortion effects to give more character to the sound.
Also, consider using "The Kings Microphones" plugin from waves, which emulates some classic microphones from this time period.
https://www.waves.com/plugins/the-king-s-microphones

Modern Radio - 1960s onwards - To achieve a more modern radio effect, you can follow a similar process to the vintage radio as described above only be a lot more gentle with your use of EQ and distortion processing. Whilst we still want our sound to have a vintage character, radio from this time period had a much cleaner sound given the advancements in both microphone and broadcast technologies.

You can use an EQ setting such as this to convey a modern radio effect.
Police / Army Radio - A Police or military radio effect will be very similar to both of the radio examples given in this section, except that we would give more prominence to the use of distortion and lo-fi processing. Giving the dialogue an extra layer of static and degradation really helps to sell the idea that the characters are in an active warzone, police chase or shootout etc.

As you can see from the points we have discussed above, there are a lot of different methods that can be used to achieve your desired dialogue effect. Its worth spending some time becoming more familiar with each of these techniques, and putting the principles we have discussed here into practice so that you can develop your own creative methods that are suited to your ear.
We hope you enjoyed checking out this article! If you would like to stay up to date with all things 344 Audio then please follow our socials via the links below.